Do
you want to take a screenshot on laptop in the easiest way? Do you a windows
user? If yes then this tutorial is for you. In this article, we have to show
how to take screenshot on laptop easily and quickly. Sometimes we need to take
a screenshot of our laptop or desktop screen for our work. Or if you are a game
lover and want to capture the best score or magic moment than you need to know
the way to take a screenshot. There are many third party apps available to take
a screenshot that’s are some paid and some free. If you want to capture your
screen without any cost then windows default screenshot way is the best
solution for you. Let’s go to see the easiest way to take screenshot on laptop.
How to take screenshot on laptop
Method 1: Use the Snipping Tool
I love this method to take a screenshot and I follow this way
for my work. The snipping tool is an awesome computer app to take screenshots.
You can use this tool to take any kind of screenshot. Again you can use this
tool to do some light editing.
for my work. The snipping tool is an awesome computer app to take screenshots.
You can use this tool to take any kind of screenshot. Again you can use this
tool to do some light editing.
How to take screenshot on laptop by snipping tool
- In your windows search box type “snipping tool“
- Now click on the software.
- Click on the “New” option
- Select how much area you want to take capture
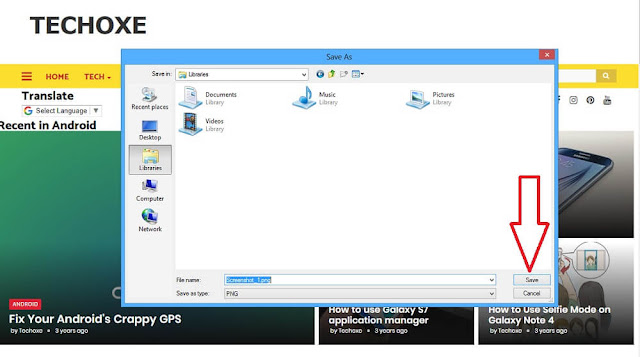
- Click on “Save As” button or press Ctrl + S from
your keyboard
- Now Select the folder to save your image file.
- Select the image format example: jpg, png.
- Click on the “Save” button.
It’s done.
Method 2: Use the keyboard shortcut:
PrtScn (Print Screen) or CTRL + PrtScn
This first way to take a screenshot on windows is well known
in all windows user and this method works on all version of windows. Ok, let’s
start the method.
in all windows user and this method works on all version of windows. Ok, let’s
start the method.
- Firstly from your keyboard press the PrtScr (Print Screen)
key or CTRL+PrtScn keys. Windows creates a screenshot of the whole screen of
your computer and it saved into the clipboard.
- Secondly, you should open an Image editor like paint.
- After opening the image editor just paste (Ctrl + V from your
keyboard) the image from the clipboard.
Now you can save your screenshot as an image file with any
image format. Again you can edit your screenshot in this image editor.
image format. Again you can edit your screenshot in this image editor.
Method 3:
Using the keyboard shortcut:
Windows + PrtScn
By
using this method you need not any image editor to save the screenshot in your
hard drive. Just press Windows + PrtScn keys from your keyboard.
using this method you need not any image editor to save the screenshot in your
hard drive. Just press Windows + PrtScn keys from your keyboard.
Now
windows automatically store the screenshot into the pictures library in the
Screenshots folder.
windows automatically store the screenshot into the pictures library in the
Screenshots folder.
The image file name will be like “Screenshot(number).png“. The number
will vary how many screenshots you have taken.
will vary how many screenshots you have taken.
If
you are windows 10 user then you can also find the screenshots image files by
going to “Folders -> Pictures -> Screenshots.“
you are windows 10 user then you can also find the screenshots image files by
going to “Folders -> Pictures -> Screenshots.“
Besides
creating and saving the screenshot files windows also place a copy of the
screenshot in the clipboard.
creating and saving the screenshot files windows also place a copy of the
screenshot in the clipboard.
Method 4: Use the keyboard shortcut: Alt + PrtScn
In this method just Alt + PrtScn from your
keyboard. The screenshot has done and it saved on your clipboard.
keyboard. The screenshot has done and it saved on your clipboard.
Now open any image editor example Paint or any
other and paste (Ctrl + V from your keyboard) the image and save it with any an image format that you want and if you want you can edit your screenshot with
your own choice.
other and paste (Ctrl + V from your keyboard) the image and save it with any an image format that you want and if you want you can edit your screenshot with
your own choice.
Method 5: Use
the keyboard shortcut: Windows + Shift + S (Windows 10 only)
- If
you are a windows 10 user then press Windows + Shift + S keys from your
keyboard.
- After
did this process the screen is dimmed and a cursor is shown to draw the area
how much area you want to take a screenshot.
- Now
press the left key of your mouse button and draw the area that you want to take
capture and release the mouse button.
- If
you are a touchscreen user then draw the area that you want to take capture
with your finger or pen on your computer screen.
- The screenshot has done and it saved on the
clipboard.
- Now open any image editing app and press Ctrl + V
from your keyboard to paste the screenshot on image editing app.
Now you can edit and save your image.
Best screenshot software for 2019
Lightscreen is a very easy tool to take a screenshot. This
screenshot tool allows you to automate the process of saving &cataloging
screenshots. I love this tool.
screenshot tool allows you to automate the process of saving &cataloging
screenshots. I love this tool.
What are its main features?
- This tool for Windows and Linux.
- Very easy to access.
- Best 6 configurable actions with global hotkey access.
- Uploading the screenshot to imgur.com.
- Preview window to see your screenshot.
How to take screenshot by Lightscreen?
- Firstly click on the Lightscreen icon
- Secondly, drag and select how much area you want to take capture
and release your mouse right button.
- Thirdly press (CTRL +s) key from your keyboard. Or follow
this bellow picture.
- Fourthly select your folder location where you want to save
the screenshot.
- Fifthly select the image extension for example PNG, JPEG, BMP
- And finally, press on the “save” option.
Work is done!
Which is the best method for taking screenshot on laptop?
In this tutorial as you can see we have shared many ways to
take a screenshot. Which method do you love to take your screenshot? Don’t
forget to share via comment. If you think this tutorial about how to take
screenshot on laptop is useful then please share this article with your
friends. Have a great day!
take a screenshot. Which method do you love to take your screenshot? Don’t
forget to share via comment. If you think this tutorial about how to take
screenshot on laptop is useful then please share this article with your
friends. Have a great day!


